Storage methods for grape cuttings in winter and germination in spring
Cutting is an efficient and fast way to propagate grapes. Each part of the stem, separated from the vine, gives a self-rooted seedling under favorable conditions. At the same time, the varietal characteristics and useful qualities of the mother plant are fully preserved.
The content of the article
How to properly harvest grape cuttings in autumn
The period of harvesting lignified cuttings (shanks) begins with autumn leaf fall and continues until the first frost, until the bushes are sheltered... The overwintered vine weakens and is often damaged by frost. Therefore, the survival rate of cuttings of autumn harvesting is higher than that of spring harvesting.
Selection
Tall, middle-aged, high-yielding bushes are used for cuttings.... Harvesting is done from well-ripened shoots during the autumn preliminary pruning.
Council. If a crack is heard with light pressure on the internode, it means that the shoot is ripe.
You cannot harvest shanks:
- from plants damaged by insects or diseases;
- from the vine, where shedding of flowers and strong "pea" of berries was observed;
- from fattening shoots with a large core and loose wood;
- from shoots with elongated internodes.
Shoots suitable for grafting are located on the fruit arrow or on replacement knots... Cuttings are taken from the lower or middle part of the shoot, where the accumulation of carbohydrates occurs to a greater extent.
Signs of a well-matured shoot suitable for harvesting shanks:
- Bright color of bast, characteristic of the variety.
- Brown color where leaves are attached.
- The stem diameter is 7-12 mm.
- The ratio of the core diameter to the total diameter of the shank is less than 50%.
- High content of carbohydrates, which are involved in the formation of auxins (growth hormones).
At home, the degree of ripening is determined by starch test - the cut is dipped for 1-1.5 minutes in an iodine solution (1%). The more intensely the cut is colored, the higher is the degree of accumulation of sugars - the shoot is ready for grafting.
Important! Planting material cannot be harvested from a vine cut in advance, which begins to wilt - after three days it loses 5% of moisture, after five days - 10%.
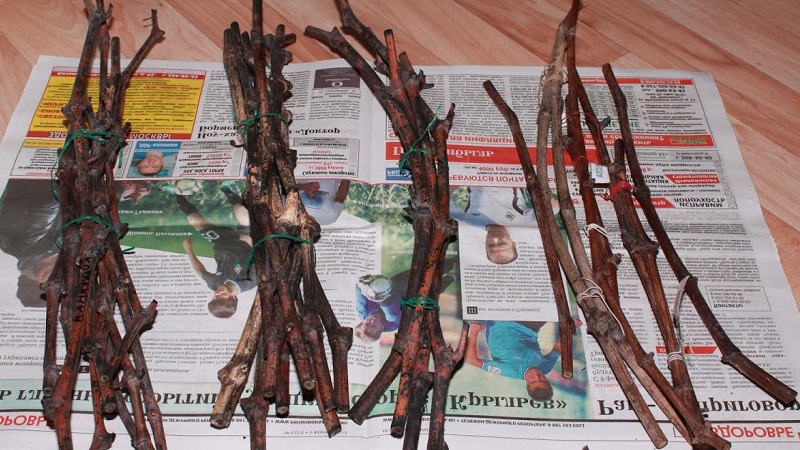
Slice
The shank is cut with a sharp knife or razor under the lower eye... The location of the upper oblique cut is 1.5-2 cm above the eye. The direction of the bevel is the side opposite to the peephole.
Chubuki "with a crutch" take root well - a piece of biennial vine at the base. Cuttings from two-year-old wood with a one-year knot in the upper part build up a powerful root system.
Chubuki free from antennae, stepsons and unripe areas.

Disinfection
Chubuki are treated with drugs that protect against fungal and bacterial diseases.
Treated with 2% iron or copper sulfatesoaking them for 30 minutes.
If the cuttings are harvested in a dry year, they are soaked in a quinosole solution:
- at water temperature above 15ºC - soak for 2 hours;
- at a water temperature of 10ºC - for 3 hours;
- at a water temperature of 5ºC - for 5 hours.
Chubuki are dried in the shade and sent for storage.
Formalin treatment:
- 200 ml of 40% formalin are dissolved in 10 l of water.
- Then the bundles of cuttings are dipped in the solution.
The processed shafts are placed in the shade, covered with foil and left for 12 hours... Then ventilated for 3 hours and sent for storage.
Interesting on the site:
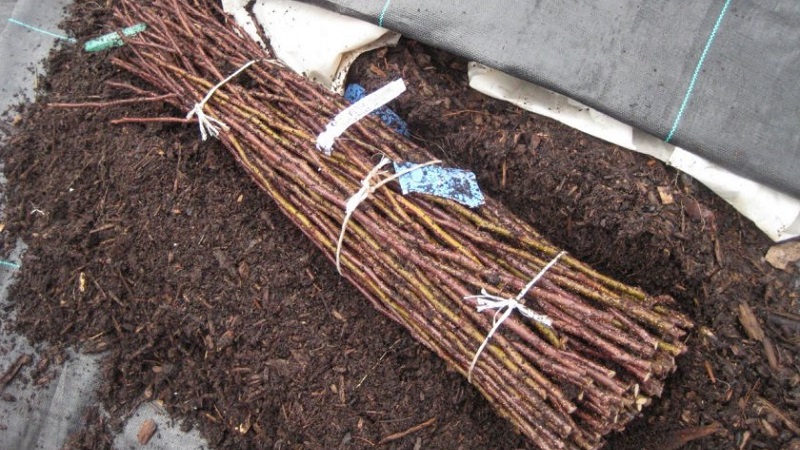
How to prepare cuttings for storage
Placed for storage on the day of cutting - in the open air, shanks lose 2% of moisture every day. They cannot be stored next to fruits - ethylene secreted by ripening fruits inhibits the development of kidneys, callus (wound tissue), and roots. Cuttings are arranged in bunches of 50-100 pieces.
Optimal conditions
Best storage conditions - temperature 0… + 4ºC, relative air humidity - 75-80%.
Mistakes to Avoid
During storage, the main thing is to minimize the loss of plastic substances., moisture and prevent fungal diseases.
Storage at the optimum temperature speeds up the formation of callus and roots, inhibits the growth of shoots.
Increasing the storage temperature to 10ºC will result in increased respiration of the cuttings, dehydration and excessive consumption of sugars. The supply of nutrients will only last for 3.5 months. Such shanks lose the ability to root.
The degree of rooting depends on varietal or hybrid characteristics.... In a warm and humid environment, Moldovan grapes are distinguished by good survival at the level of 70-80%: Kesha, Kesha-1, Arcadia, Slava Moldavia, Crystal, Kishmish Zaporozhye, Kishmish 342, Augustin, Pleven Eurostandard, Codryanka, Moldova.
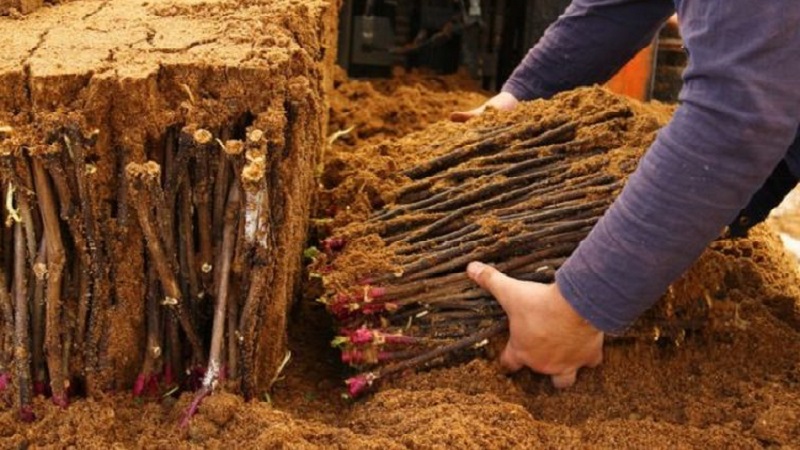
Storage methods
In the cellar, bundles of cuttings are buried in slightly wet sand or covered with sawdust.
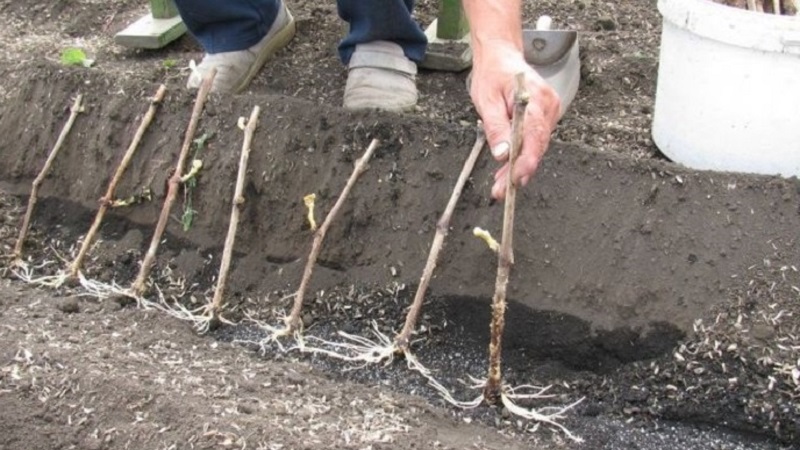
The trench is dug taking into account the length of the shanks and add 25-30 cm to the free space above them. The walls and bottom are moistened with water. A 3-4 cm layer of sand is poured onto the bottom and the bundles are set vertically. From above, the cuttings are covered with a layer of sand 5 cm high. Then they are covered with earth to the edge of the pit. With the onset of frost, a hill of earth 30-40 cm high is poured over the trench. During the winter, the pit is constantly covered with snow. A groove is dug along the edge of the trench for the outflow of water.
Bulgarian storage method:
- Chubuki harvested two more eyes than needed.
- In the basement, they are installed vertically, immersing the lower ends in water or wet sand.
- Before planting, remove the lower part and the dried upper part with one eye.
In the refrigerator, bundles are stacked in stacks and wrapped in plastic wrap on all sides. Periodically, the film is removed for airing.
Carbon dioxide accumulates under the film, which partially preserves harmful microflora and restrains the consumption of carbohydrates for breathing.
When is it time to germinate
20 days before planting, the shanks are removed from storage and the sections are updated - the lower one is made under the knot perpendicular to the axis of the cutting, the upper one is 2 cm above the peephole, obliquely in the direction opposite to the peephole.
Furrowing the lower part of the shank will allow the roots to hatch faster... Longitudinal damage to the bark is inflicted by holding one or two internodes along the teeth of a garden saw. If the stalk is full size, then the lower end is furrowed with two eyes, if it is two-eyed, the lower third is furrowed.
How to do it right
Cuttings with updated cuts are soaked - immersed two-thirds of their length in water at room temperature for 1-6 days... A day later, check the moisture content of the shanks - make a fresh cut in the upper part with a sharp knife. If it is wet, then the soaking is finished, if not, it is continued for three more days. Then they check again. If the cut is dry, change the water and continue to soak for another three days.
In large nurseries, after soaking, cuttings are harvested in special greenhousesto initiate the formation of root buds before bud break. This is achieved by cooling the upper part of the segments and heating the lower one. If the cuttings are planted without kilchevaya, the buds will bloom before the roots are formed. Such specimens may dry out in insufficiently moist soil.
At home, kilchev is replaced by stratification.:
- Germinated in a box, equal in height to the length of the cutting.
- Steamed earth or sawdust is poured onto the bottom with a layer of 1-2 cm.Beams are vertically installed.
- The bases are sprinkled with earth 5-7 cm, covered with wet sawdust to the top, leaving one upper eye open.
- The box is installed in a room with a temperature of + 20 ... + 25 ° C for 14-20 days.
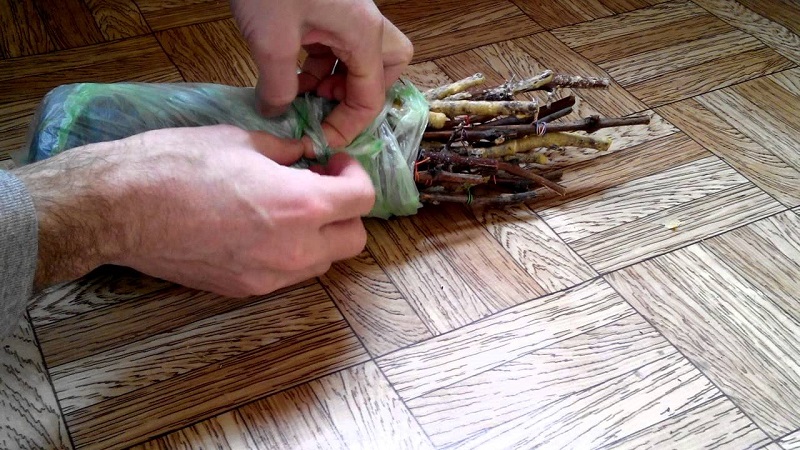
In the conditions of the apartment they are stratified in long plastic bags with loosely tied top edges. The bags are placed on a cabinet for 16-20 days at a temperature of + 22 ... + 25 ° C, in daylight. The package is opened 3-4 times for airing. If the surface of the cutting dries out noticeably, it is slightly moistened.
At the lower ends of the cuttings formed gray-white influx (callus) with punctate tubercles - root buds. Roots often grow from 2 to 7 cm long.Green shoots 2-5 cm long appear from the upper two eyes.
Root regrowth is accelerated by treatment with growth stimulants within 12-16 hours:
- heteroauxin - 1-2 tablets per 1 liter of water;
- bee honey - 1 tsp. for 1 liter of water;
- hyperauxin - 1-2 tablets per 1 liter of water.
The temperature of the solution should be no higher than 17 ° C ambient air, and during treatment with stimulants - not higher than + 22 ... + 23 ° C.
Double spraying with gibberellin at a concentration of 25 mg / l increases shoot growth by 15-17%.
Read also:
How and what to properly feed grapes in autumn
Why do you need pruning grapes in the fall and how to carry it out
Germination methods
Under favorable conditions - temperature, humidity, the presence of stimulants and nutrients, the process of regeneration of cuttings begins. Healing tissue (callus) is formed, then roots.
According to Radchevsky
Pre-processed cuttings are dipped in a jar, at the bottom of which a layer of cotton wool or foam is laid. The top of the cuttings is waxed to protect it from drying out. Water is poured into the jar so that the top of the cotton wool or foam is covered by 2 cm. The neck of the jar is closed with foil, holes are made and the shafts are inserted. The temperature at the bottom is maintained at + 23 ... + 25 ° C, at the top - as low as possible.

Roots are formed at the water-air interface, "Heels" lightly touch the water. The advantage of the method is that the cuttings do not rot if there is no water change.
By Pusenko
The lower eye is cut from the handle and several cuts are made on the bast on the lower part - this technique stimulates root formation. A section of the canvas is moistened with water and the shanks are placed on it in a row so that the ends are in the middle of the fabric.
The second half of the canvas is covered with cuttings, closed at the edges and folded tube design. Then the cuttings wrapped in cloth are wrapped in plastic wrap and stored in a warm place until rooting. Periodically open for inspection, moisten if necessary.
In the filler
Wet porous materials are used as filler - a layer of sand, expanded clay crumbs, old sawdust, from which the resinous smell has disappeared. The filler is poured into a container, moistened and shanks are placed on it.
Also grown in containers in a substrate, which must be at least 0.5 liters. Plastic bottles or paper bags from milk or juice are fitted under the containers.
The filler consists of sand, sawdust and peattaken equally. Add some loose earth. It is better to replace sand with expanded clay screenings, perlite or vermiculite. The moisture content of the filler is determined by squeezing in a fist - single drops should be released from the substrate. The bottom of the boxes is pierced and a handful of rubble is poured in to avoid stagnant water. Before planting, the substrate is steamed in a water bath and cooled to room temperature.
What to do with sprouted cuttings
Chubuki, which entered the initial stage of vegetation and formed roots, are planted into any containers made of cardboard or film up to 30 cm in height, 8-10 cm in diameter in an apartment or winter greenhouse. Homemade vessels are installed in small boxes 15-20 cm high with slots or holes 3-5 mm in the bottom. The bottom of the box is lined in one layer with soft paper.
The cylinders are filled with a soil mixture with a layer of 4-5 cm, slightly compact it, carefully introduce a stalk or seedling of grapes to the level of the soil, cover it with the same mixture and wate it with warm water.
Soil composition:
- sod or forest land;
- humus or peat;
- coarse sand.
The components are taken in equal parts.
Saplings are fed with poultry droppings and microelementsprovide adequate lighting.
Water the seedlings in cardboard, film vessels as needed - Once every 7-10 days in January, February and March and once every 5-7 days in April and May until disembarking at a permanent place.
1-2 shoots are left on one plant grown from a cuttings, the extra ones are removed as they appear.
Growing grapes from cuttings at home
Two-eyed shanks are taken out of the refrigerator and cut into pieces 20 cm long... The upper oblique cut is made 2 cm above the upper peephole, the lower straight cut 0.5 cm below the peephole. Completely immersed in water and soaked for two days.
The next step is to kill on a battery in one of the ways:
- The lower part of the shoot is wrapped in moist moss and placed in a bag.
- Pre-scalded sawdust is poured into a plastic glass, a shank is placed there. A plastic bag is put on top so that moisture does not evaporate.
Cuttings are placed on a battery at a temperature of 30ºC... The top should be cool. In 2-3 weeks, root buds and leaves are formed. Cuttings can be planted in a container.
Plants are planted in open ground when the threat of return frosts has passed... Choose a bright place protected from the prevailing winds. The first two weeks, the seedlings are shaded from the hot sun.
Conclusion
Germinating cuttings increases the growing season by 2-3 months. In open ground, seedlings are planted with a large run in growth - they have a viable root system and 8-12 leaves. The bushes develop faster, fruiting occurs without delay, the grapes reach full winter hardiness in time.